Search Google

Custom Search

Search Results

Showing posts with label tricks. Show all posts

Saturday, August 8, 2009

How To Do An Invisible Decrease in Crochet


What is a decrease in crochet? Decreases are used to make a crocheted piece narrower by reducing the number of stitches you are working with. For instance when making a ball, you want the piece to gradually get wider, which can be attained by "increases" in the work. Then you want the piece to gradually get narrower, which is attained by "decreases" in the work. To do a single crochet decrease in a crocheted piece, a single crochet is done in 2 stitches together (sc2tog).

When doing Amigurumi crochet it's best to do an “invisible” decrease, rather than the traditional decrease. This will avoid the “bumps” left by the traditional decrease and make your piece much more smooth and professional looking. This tip will not only save you time, but your sanity as well at times.

Before we get started, it's important to note that when making an invisible decrease you will be working in the front loops only of your 2 stitches. (As illustrated in this diagram).


To do an invisible decrease simply follow these steps:

1. Insert your hook into the front loop only of the first stitch. Do not yarn over and pull up yarn as you would in a traditional decrease.

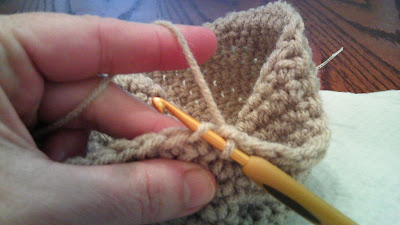
2. Insert your hook into the front loop only of the next stitch. You will need to turn the tip of your crochet hook downward to do this.

Then swing your crochet hook up, and under the front loop of the 2nd stitch. You now have 3 loops on your hook.


3. Yarn over and pull the yarn thru the first 2 loops on your crochet hook, leaving 2 loops on your hook.


Then yarn over again and pull yarn thru the last 2 loops on your crochet hook.


Congratulations! You have now made an invisible decrease with no 'bump' in your work.


This technique may take a little practice, but once you master it you will never go back to decreasing the traditional way.

I hope this tip makes your Amigurumi life a little easier!

Thanks for visiting.


Stumble Upon Toolbar

Thursday, July 16, 2009

Amigurumi Tips & Tricks

As I do more of this Amigurumi crochet I'm finding that there are a few "tweeks" that need to be done that are different from just your everyday crochet. The first thing I found out (the hard way, lol) is that Amigurumi crochet stitches must be pulled very, very tight! Why is this so important? Well, the biggest reason is that Amigurumi stuffed toys are stuffed extremely full. If your stitches are not as tight as you can possibly get them the stuffing will show thru. Especially if your yarn is a dark color. I found this out with my first project, pictured below, the lady bug. Her head is black, which is in my opinion the most unforgiving color when you're using white polyfill stuffing! I could see the white peeking thru and it was very noticeable! Drove me crazy in fact. So tip #1, pull your stitches TIGHT! It's a little harder when you're crocheting the piece, but well worth it if you want a professional looking and beautiful finished piece!
My first Amigurumi Project!


And speaking of stuffing the amigurumi creation, tip #2 is that you will need to stuff and stuff the piece. And when you think you can't possibly fit any more stuffing, stuff it some more! This makes for a firm, evenly proportioned piece that will hold the shape whether sitting or standing up. Now there are some patterns that will instruct you to stuff the piece lightly....for example my bunny tail, and in those cases you'll want to follow the pattern instructions. Any other time..stuff, stuff and stuff some more!

The 3rd tip is to start your piece using a " Magic Adjustable Ring". This will give you a very small, almost non-existent hole in the beginning of your piece. Being sceptical if this would really make that big of a difference, I tried starting my piece both ways and found that it makes a huge difference! The "magic adjustable ring" is not that hard to master and with a little practice it's even easier than the traditional way of starting a crochet "circle". Here is a link for those that don't know how to create the magic adjustable ring : http://www.crochetme.com/Dec_Jan_0405/reads_round.html It's well worth taking the time to master this handy little technique!

I'm sure I'll be discovering more tips since I'm kinda learning Amigurumi crochet as I go!
Does anyone have any tips to add?


Stumble Upon Toolbar
Related Posts with Thumbnails

My Favorites